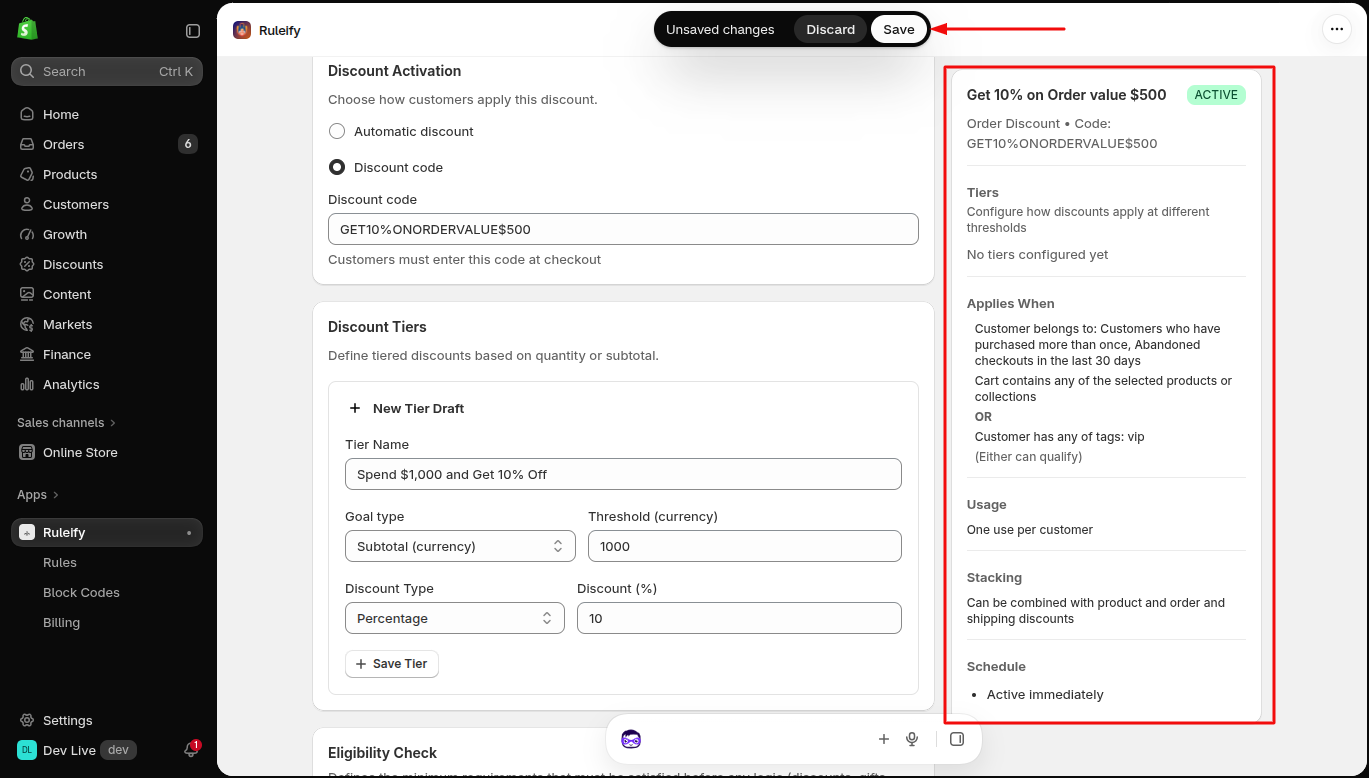
An Order Discount allows you to offer discounts based on the customer's order. You can configure discounts based on the order value or quantity, set eligibility conditions, and control when and how customers can use the discount.
Follow these steps to create an Order Discount in Ruleify.
Step 1: Open Order Discount
Open your Ruleify dashboard.
Under the Create Discount Rule section, click Order Discount to start setting up a new order discount.
Step 2: Enter the Discount Name
Under the Basic section, enter a name for your discount.
Choose a name that helps you identify the discount easily.
Example: Summer Sale Order Discount
Step 3: Choose the Discount Activation Method
Choose how customers will receive the discount.
Automatic Discount: The discount is applied automatically when the customer meets the configured conditions.
Discount Code: Customers must enter a discount code at checkout to receive the discount.
If you select Discount Code, scroll down the page to find the Usage Limits section, where you can configure how many times the discount code can be used.
Step 4: Configure Discount Tiers
The Discount Tiers section lets you define the conditions customers must meet to receive a discount and the discount amount they will receive.
4.1 Tier Name
Enter a name to identify the discount tier.
Example: Spend $1,000 and Get 10% Off
4.2 Goal Type
Choose the condition customers must meet to qualify for the discount.
Select the appropriate option available in the Goal Type dropdown.
For example, if the available option is Subtotal (currency), you can use it to set a minimum order value.
4.3 Threshold
Enter the minimum value or quantity required to qualify for the discount, depending on the selected Goal Type.
Example: If you select Subtotal and enter 1000, the customer must meet the configured $1,000 order-value threshold.
4.4 Discount Type
Choose how the discount will be calculated.
Percentage: Reduces the eligible order amount by a percentage.
Example: Enter 10 to offer 10% off.
Fixed Amount Off: Deducts a fixed amount from the eligible order.
Example: Enter 100 to offer $100 off.
4.5 Discount Value
Enter the discount value based on the selected Discount Type.
Examples:
For Percentage, enter 10 to offer 10% off.
For Fixed Amount Off, enter 100 to offer $100 off.
4.6 Apply This Tier Only to Specific Products or Collections
If this option is available, enable it when the discount tier should apply only to selected products or collections.
Example: You may want the discount to apply only when the order includes products from a particular collection.
4.7 Show Advanced Settings
Enable Show Advanced Settings to configure additional rules for the discount tier.
Allow This Tier to Stack with Others: Enable this option if the tier can be combined with other eligible tiers, subject to the configured rules.
Priority: Higher-priority tiers are evaluated first when stacking is enabled.
Customer Tags (Optional): Enter customer tags to restrict the tier to customers with specific tags. click Add to apply the tag .
Example: Enter VIP and click Add Tags to apply the tag.
Exclude Customer Tags (Optional): Enter customer tags for customers who should not qualify for the tier.click Add to apply the tag .
Example: Enter Wholesale if customers with the Wholesale tag should not qualify.
After configuring the all required fields, click Save Tier to save the tier.
You can create multiple tiers to offer different discounts for different order values or quantities, depending on the available Goal Type options.
Step 5: Configure Eligibility Check
The Eligibility Check section lets you define the minimum conditions that must be met before Ruleify evaluates the discount rules.
To understand the difference:
Discount Tiers: Define the conditions for receiving the discount and the discount amount.
Eligibility Check: Defines which products or customers can qualify for the discount.
5.1 Product Conditions
Select specific products or collections if the discount should be restricted to them.
Example: If you want the offer to apply only to orders containing products from the T-shirt collection, select that collection.
If you do not select any products or collections, this section does not restrict eligibility to specific products.
5.2 Combine Product and Customer Tags
Choose how the product conditions and customer tags should work together.
AND: Both conditions must be met.
OR: Either condition can be met.
Example: If you select the T-shirt collection and enter the customer tag VIP:
AND: The customer must meet the product condition and have the VIP tag.
OR: The customer can qualify by meeting either condition.
Choose the option that matches your discount requirements.
5.3 Customer Tags
Enter customer tags if the discount should be available only to customers with specific tags. click Add to apply the tag .
Example: Enter VIP and click Add Tags to apply the tag.
If you leave this field empty, no customer-tag restriction is applied from this field.
5.4 Customer Segments
Select customer segments if you want to target customers who belong to particular Shopify customer segments.
Example: Select your repeat-customer segment if you want to target customers who belong to that segment.
If you select multiple segments, a customer can match any one of the selected segments.
Step 6: Configure Usage Limits
The Usage Limits section lets you control how many times the discount code can be used.
6.1 Limit to One Use per Customer
Enable this option if each customer should be allowed to use the discount code only once.
Example: If a customer uses the code WELCOME10 for an order, they cannot use it again.
6.2 Limit Number of Times This Discount Can Be Used in Total
Enable this option if you want to set a maximum number of times the discount can be used by all customers combined.
Example: Set the limit to 100 to allow the discount to be used up to 100 times in total.
You can enable either option or both, depending on your requirements.
Step 7: Set the Discount Schedule
Use the Schedule section to configure when your discount starts and, if required, when it ends.
7.1 Start Date :
Select the date when the discount should become available.
7.2 Start Time
Select the time when the discount should become available.
7.3 Set End Date
Enable Set End Date if the discount should stop being available at a specific date and time.
Example: If you want to run a promotion from November 1 to November 7, set the appropriate start and end dates and times.
Step 8: Configure Stacking Control
The Stacking Control section lets you choose whether your Order Discount can be combined with other types of discounts.
Available options include:
Stack with Order Discounts: Allow the discount to combine with other eligible order discounts.
Stack with other Product Discounts: Allow the discount to combine with eligible product discounts.
Stack with Shipping Discounts: Allow the discount to combine with eligible shipping discounts.
Example: If you want customers to receive an order discount and a shipping discount on the same purchase, enable the relevant options.
Discount combinations are subject to the configured rules and Shopify's discount-combination requirements.
Step 9: Review and Save Your Discount
After configuring all the settings, review the preview panel on the right side of the page to see a summary of your discount.
Check the discount name, activation method, tiers, eligibility conditions, usage limits, stacking settings, and schedule.
If everything looks correct, click Save to save your discount.